44 how to tie a double windsor knot diagram
The Double Windsor knot is the traditional tie knot most commonly used; it is symmetrical and also a more complicated than most. This knot originated from the Duke of Windsor who liked a wide knot and had his neckties made specially thick to accommodate. It was the Duke that inspired our finely woven neckties that give you a thick knot just ...
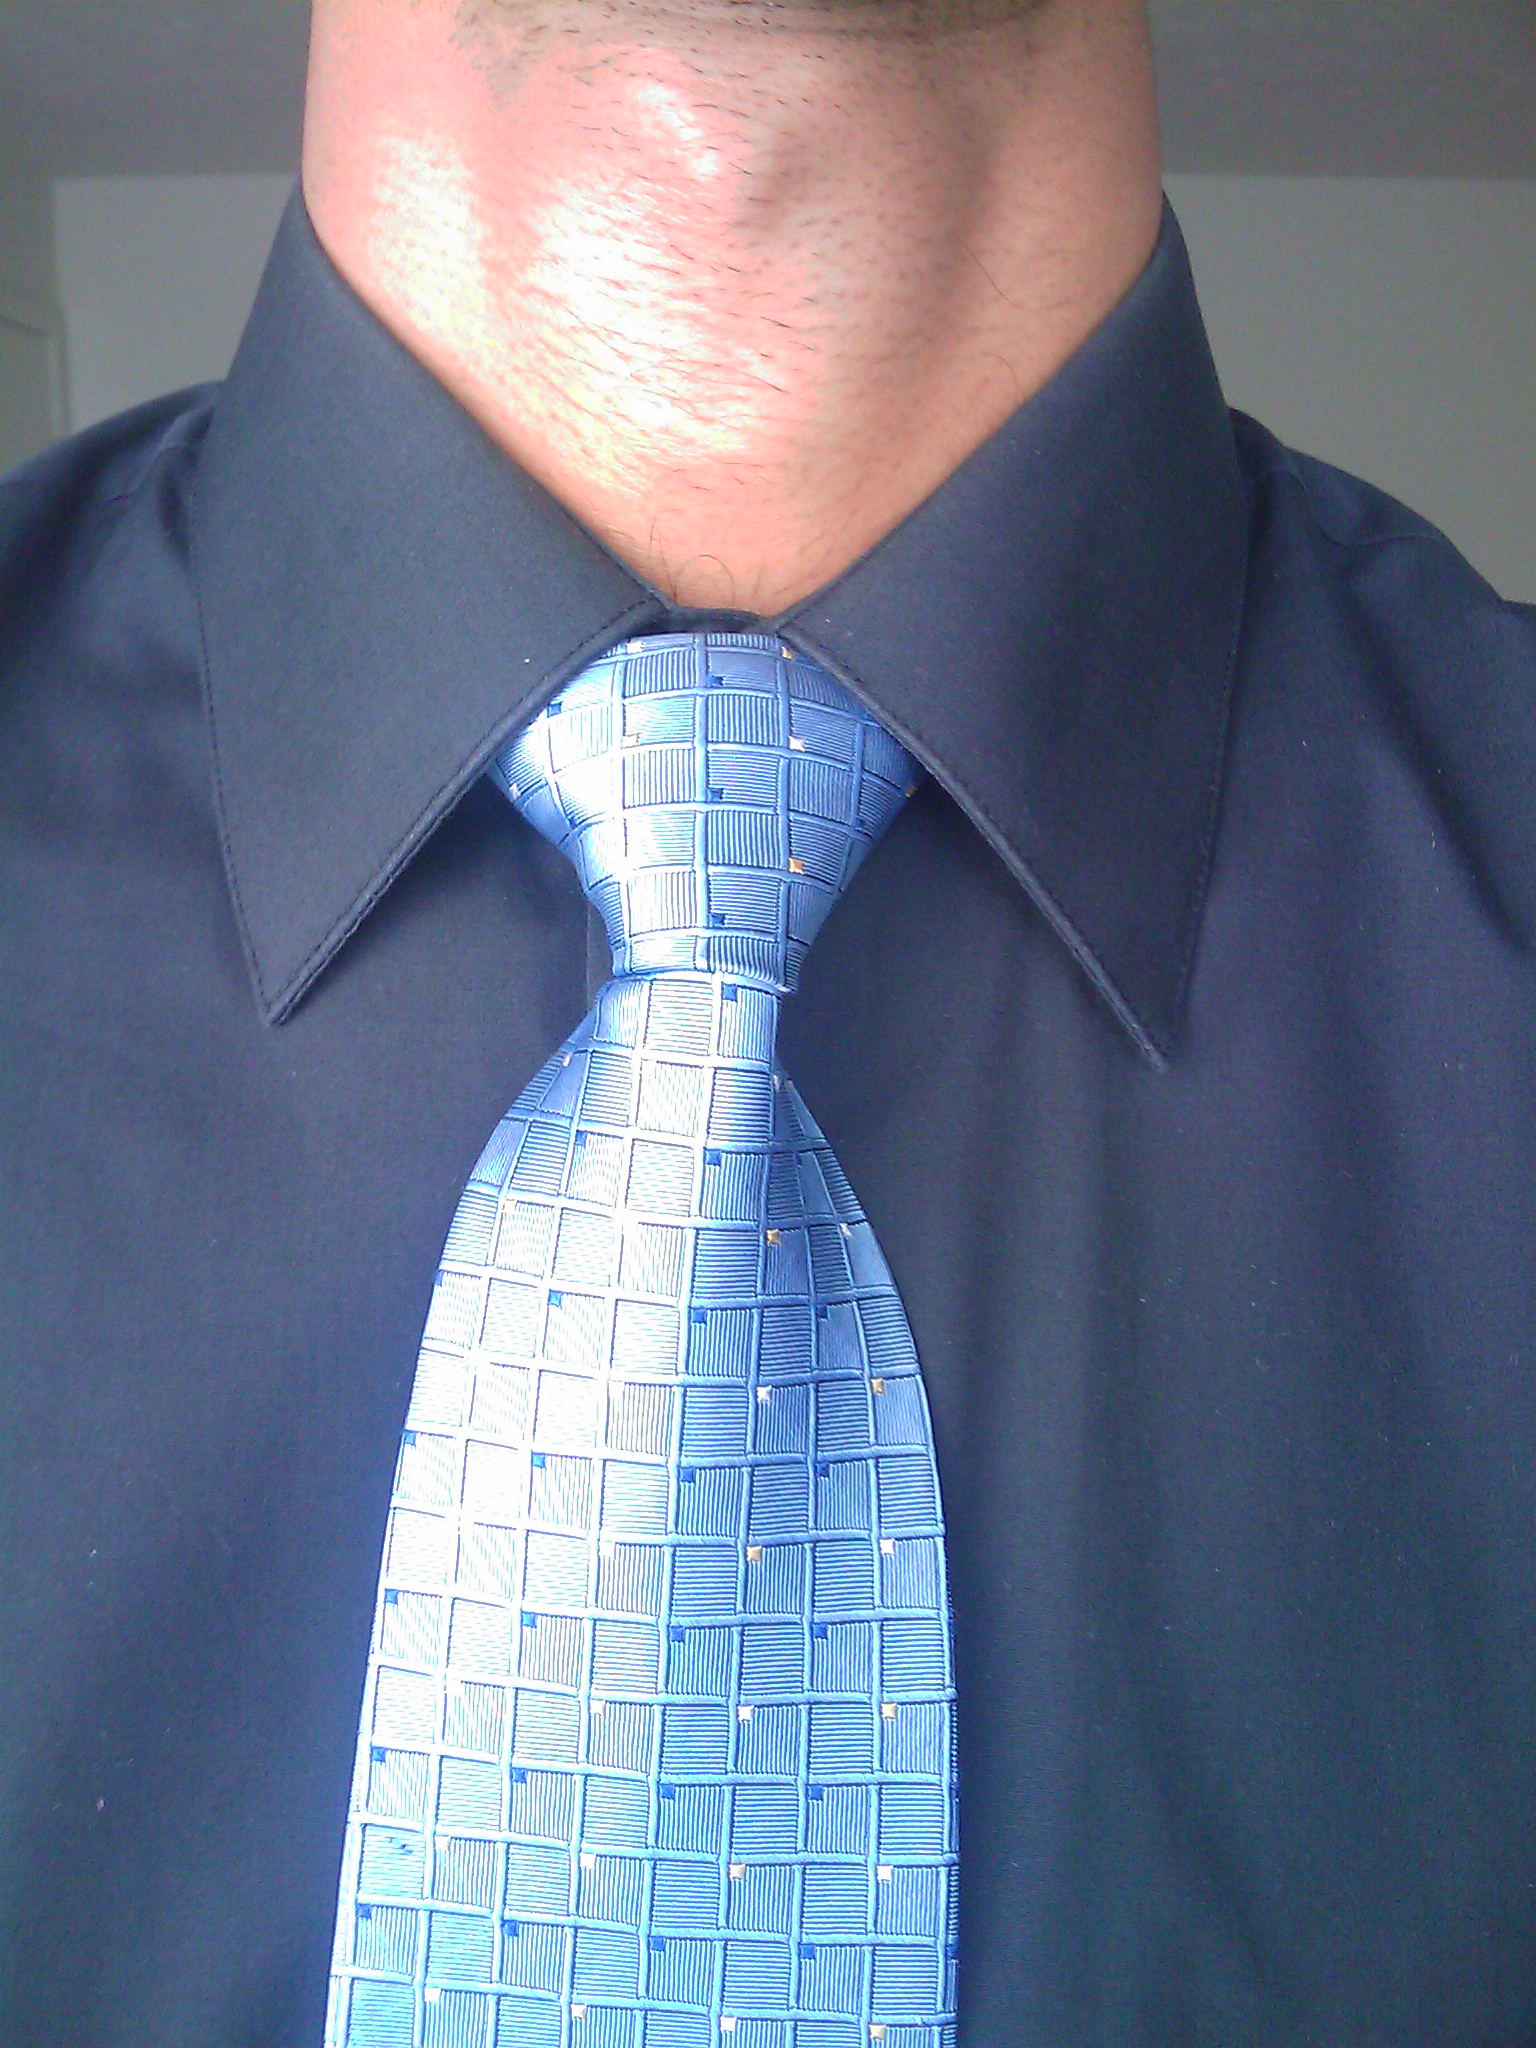
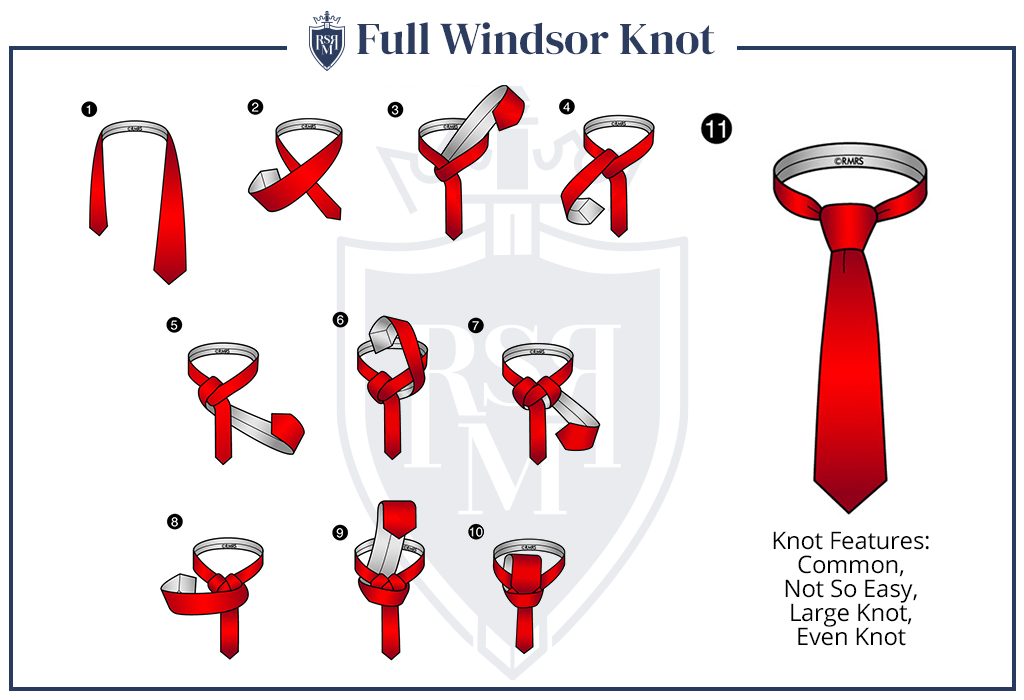
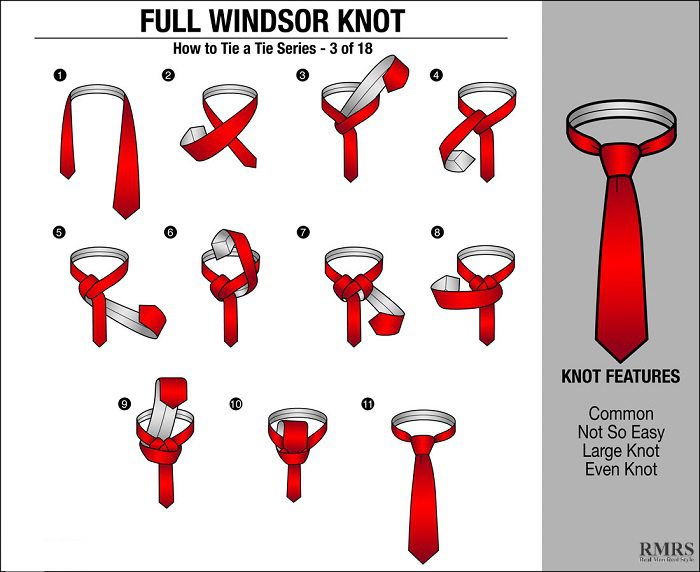
The Windsor knot is also known by the names double Windsor and Full Windsor to distinguish it from the half Windsor knot. It produces a symmetrical, wide and triangular necktie knot. The large self-releasing knot amply displays the tie design and fabric when worn with a closed coat or jacket. It can also keep your throat warm in winters.
tie a double windsor tie knot. I also used it in conjunction with my main article on tie knots: How To Tie A Neck Tie : Instructions, Diagrams and Videos For the Four Main Tie Knots, where you can go if you also need written instructions and
How to tie a double windsor knot diagram
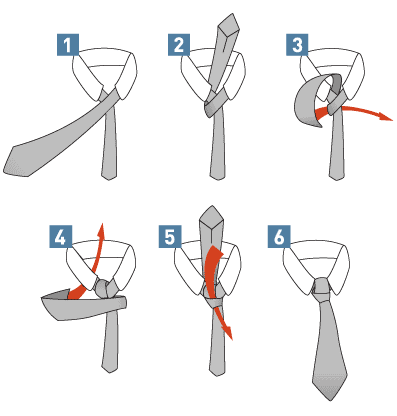
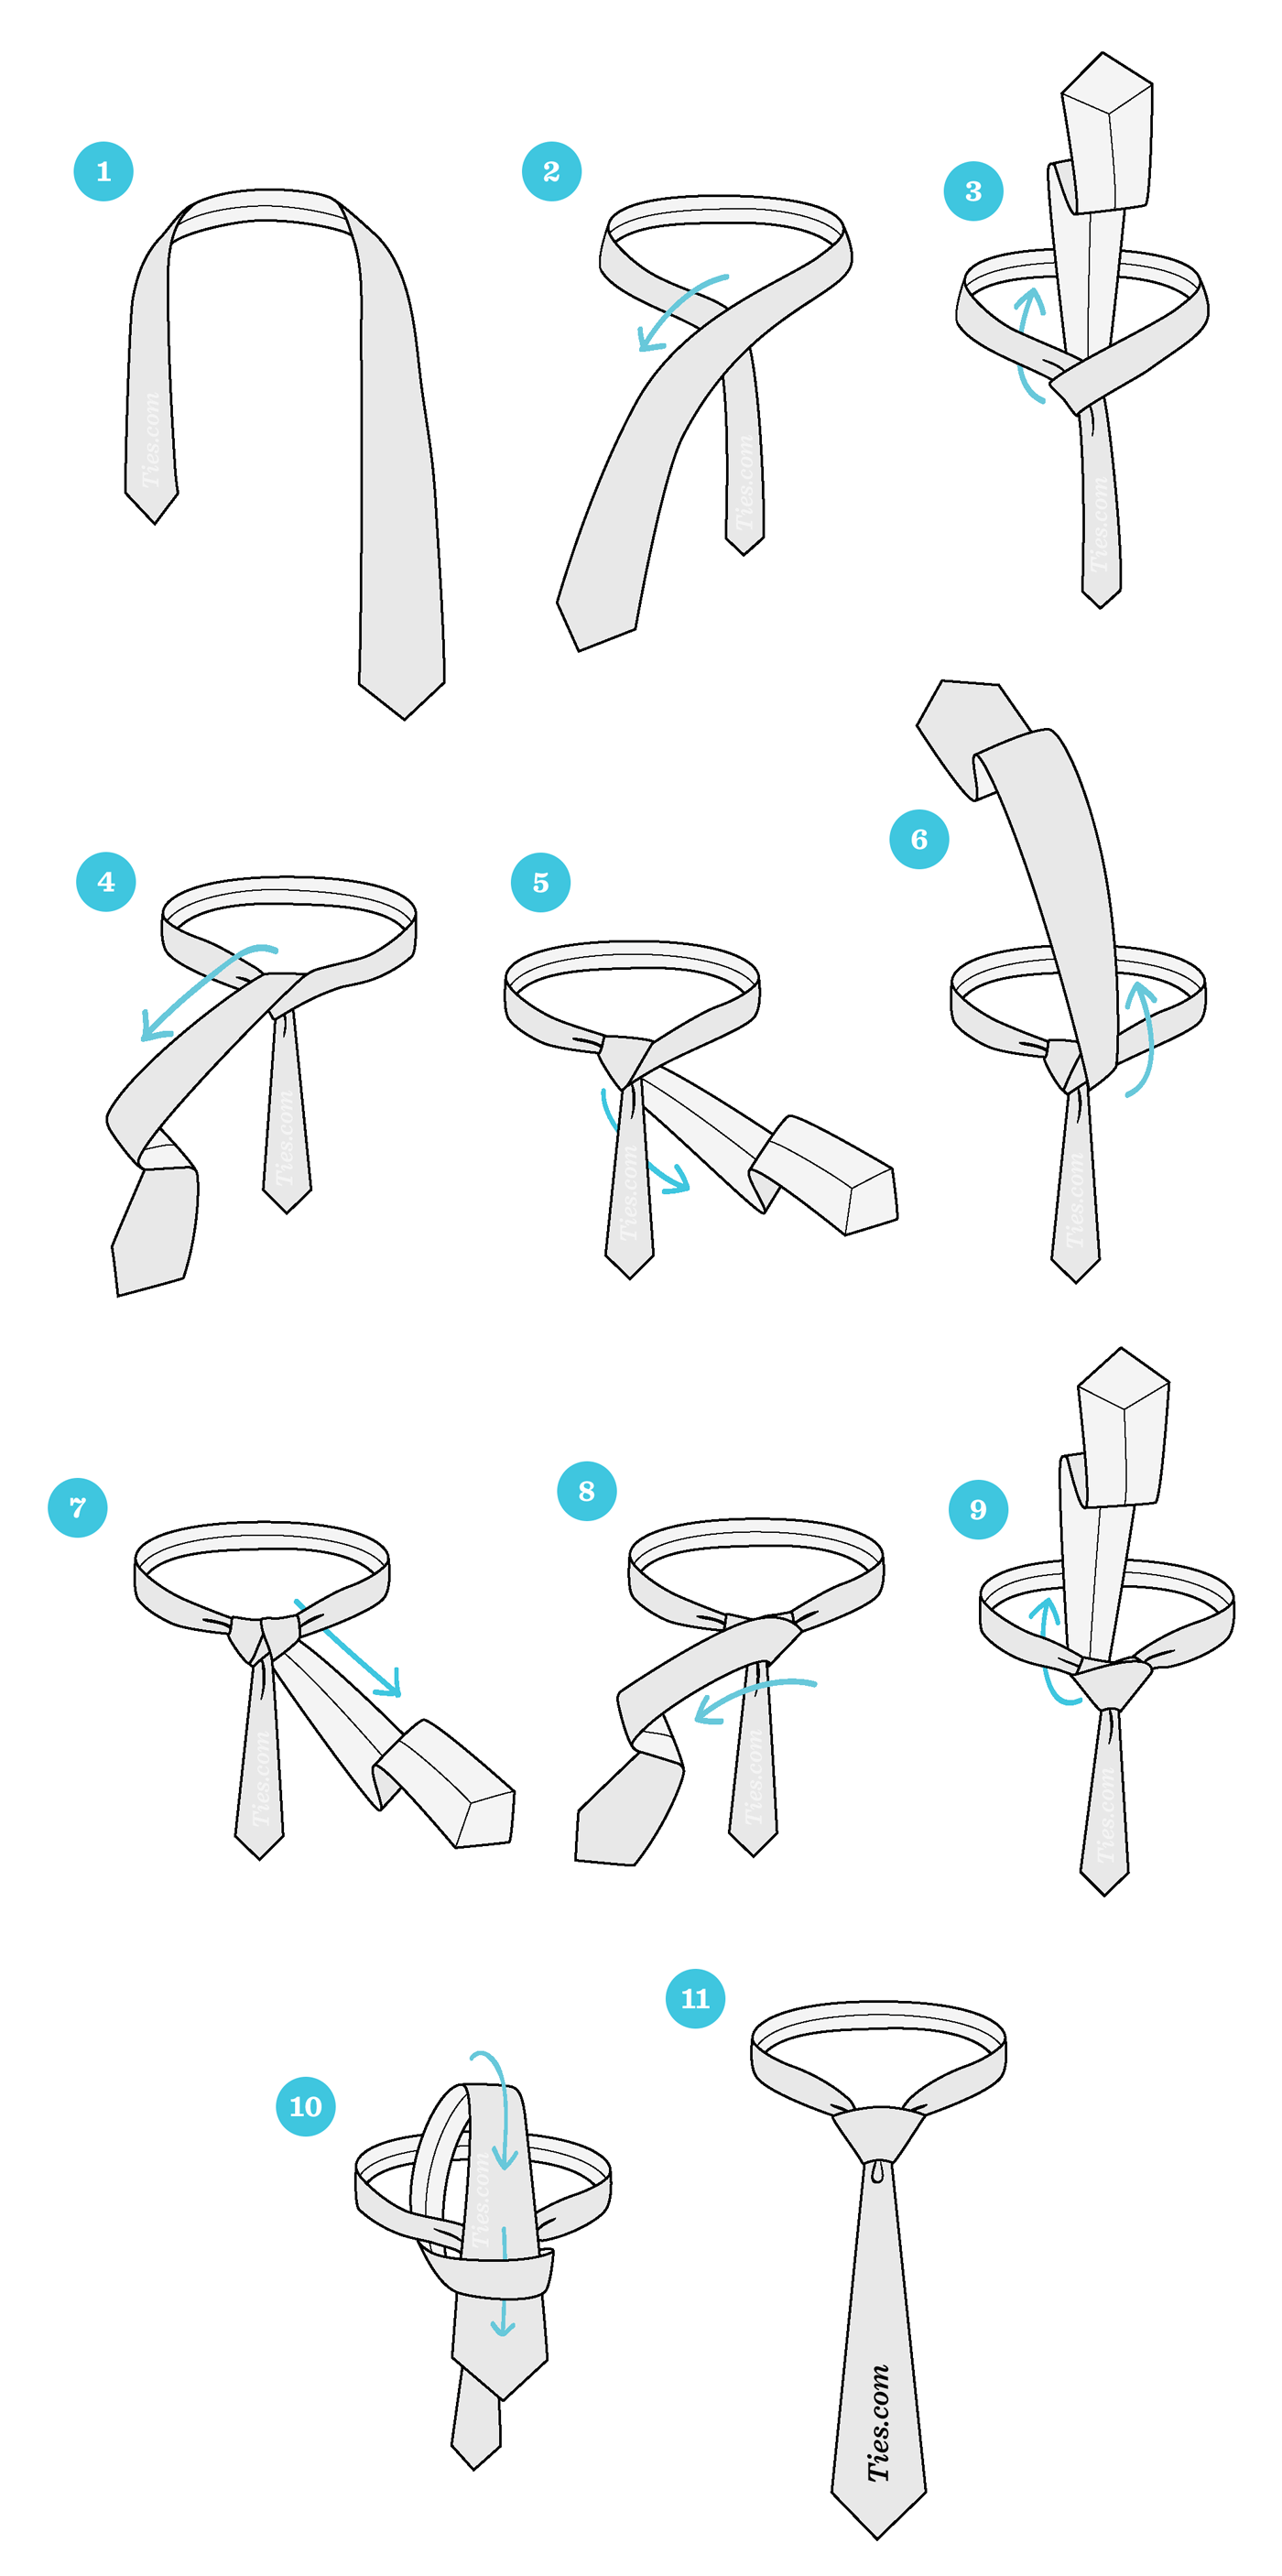
Pull the tie around the front of the knot. Bring the wide end over the front of the knot so there's a flat edge on top of the knot. Pinch the knot tight with your right hand to hold it in place. The front of your tie will now look like a boxy triangle. 6 Loop the wide end through the bottom of the neck hole.
The Windsor, also known as the Double Windsor or the Full Windsor (we know, confusing stuff), is probably the second most common way to tie a tie after the four-in-hand (the one your Dad tried to ...
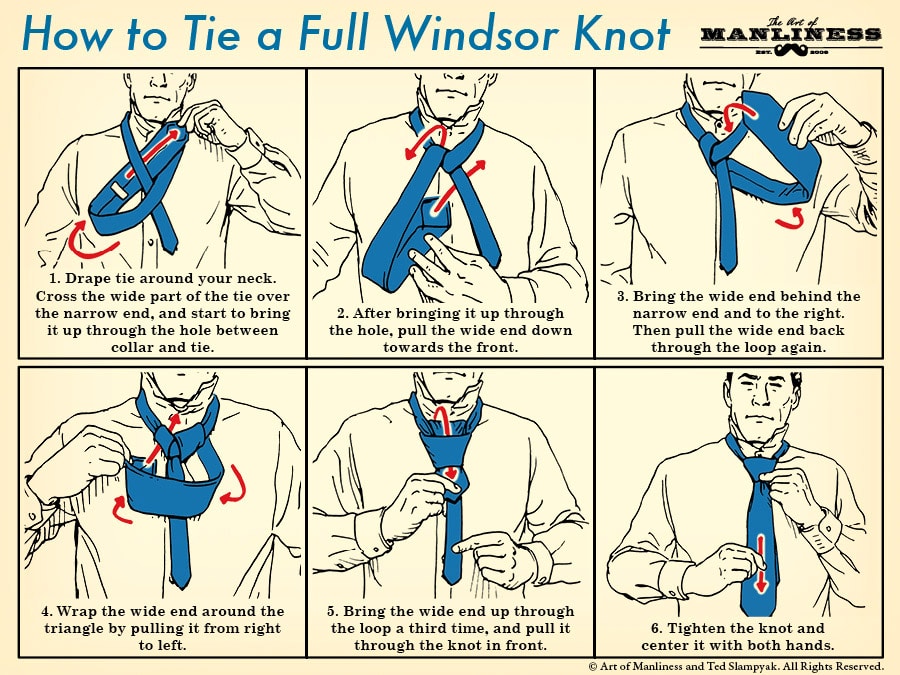
For men who are stout, or have wider faces and necks, the Windsor will look appropriately proportional with your build and mug, and should be your go-to tie knot. 1. Drape tie around your neck. Cross the wide part of the tie over the narrow end, and start to bring it up through the hole between collar and tie. 2.
How to tie a double windsor knot diagram.
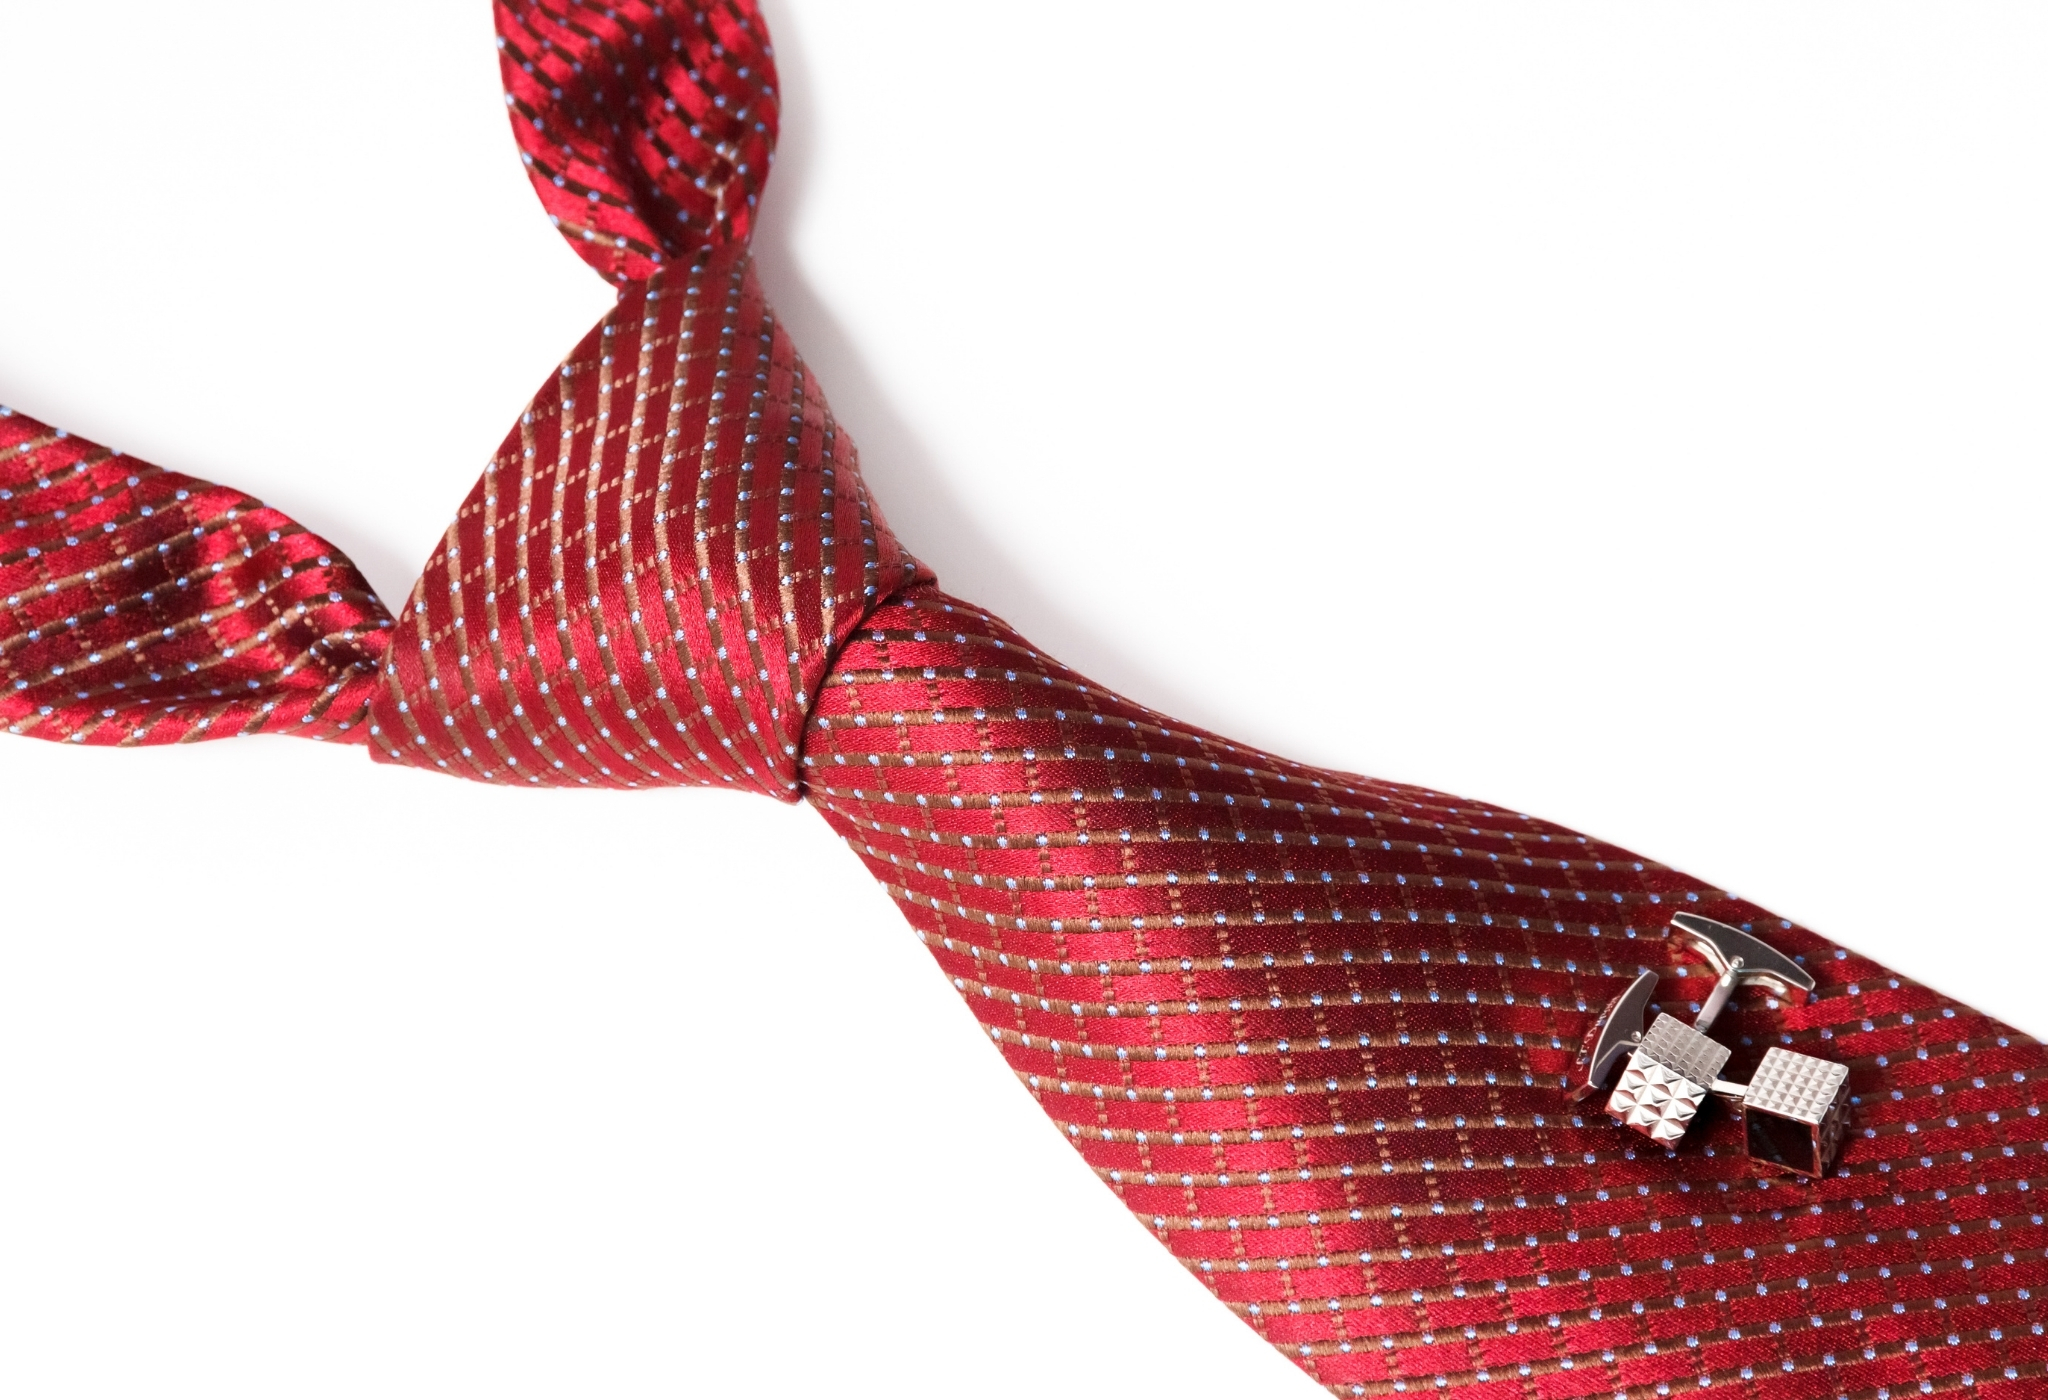
This knot is named after the Duke of Windsor and is a more symmetric, large and thicker type of knot. The Double Windsor Knot is best used with dress shirts that have wide-spread collars. Because the style of the knot is thicker and wider, more length is required from the tie to achieve the look. Taller men may con...
It was prominent in the 1950's gray business suits possibly because of the fact that the neat, crisp focal point created by the knot gives it an air of power conducive to business situations. How to Tie a Half Windsor Knot. The step by step diagram with easy instructions is beginner friendly. This tying method produces a self-releasing knot.
The Windsor knot, also known as the full or double Windsor, is one of the most popular ways to tie a tie. The Windsor knot has a wide, symmetrical base that fits any formal occasion. If you want a slightly smaller look, you can try the half Windsor instead for a sleeker profile.
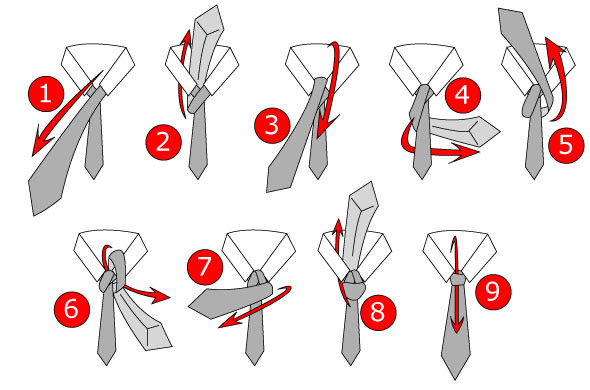
STEP 1 Start with the wide end of the tie on the right and the small end on the left. The tip of the small end should rest slightly above your belly-button (this will vary depending on your height and the length & thickness of your tie). Only move the active (wide) end. STEP 2 Wide end over the small end to the left. STEP 3
The Double Windsor Knot is best used with dress shirts that have style of the knot is thicker and wider, more length is required from the tie to achieve the look. The Windsor delivers a symmetrical and solid triangular knot that works best with a spread collar. This knot is also mistakenly referred to as the "Double Windsor".
Here is a look at a completed Windsor knot, it is up to you if you would like to dimple, double dimple, or go flat. Here is a simple 7 step diagram to help you tie your windsor knot…it's actually pretty simple. A note on position, when getting started, the shorter the narrow end is around your neck, the longer the tie will be when finished.
The Windsor knot is sometimes known as the Full Windsor knot or Double Windsor knot. This is to distinguish it from the smaller Half Windsor knot. It is the largest of the four most popular necktie knots. The Full Windsor knot creates a comfortable space between the collar and the neck while holding the tie in place.
The double windsor gives a professional.The Windsor knot is also known by the names double Windsor and Full Windsor to distinguish it from the half Windsor knot. It produces a symmetrical, wide and triangular necktie knot. The large self-releasing knot amply displays the tie design and fabric when worn with a closed coat or jacket.
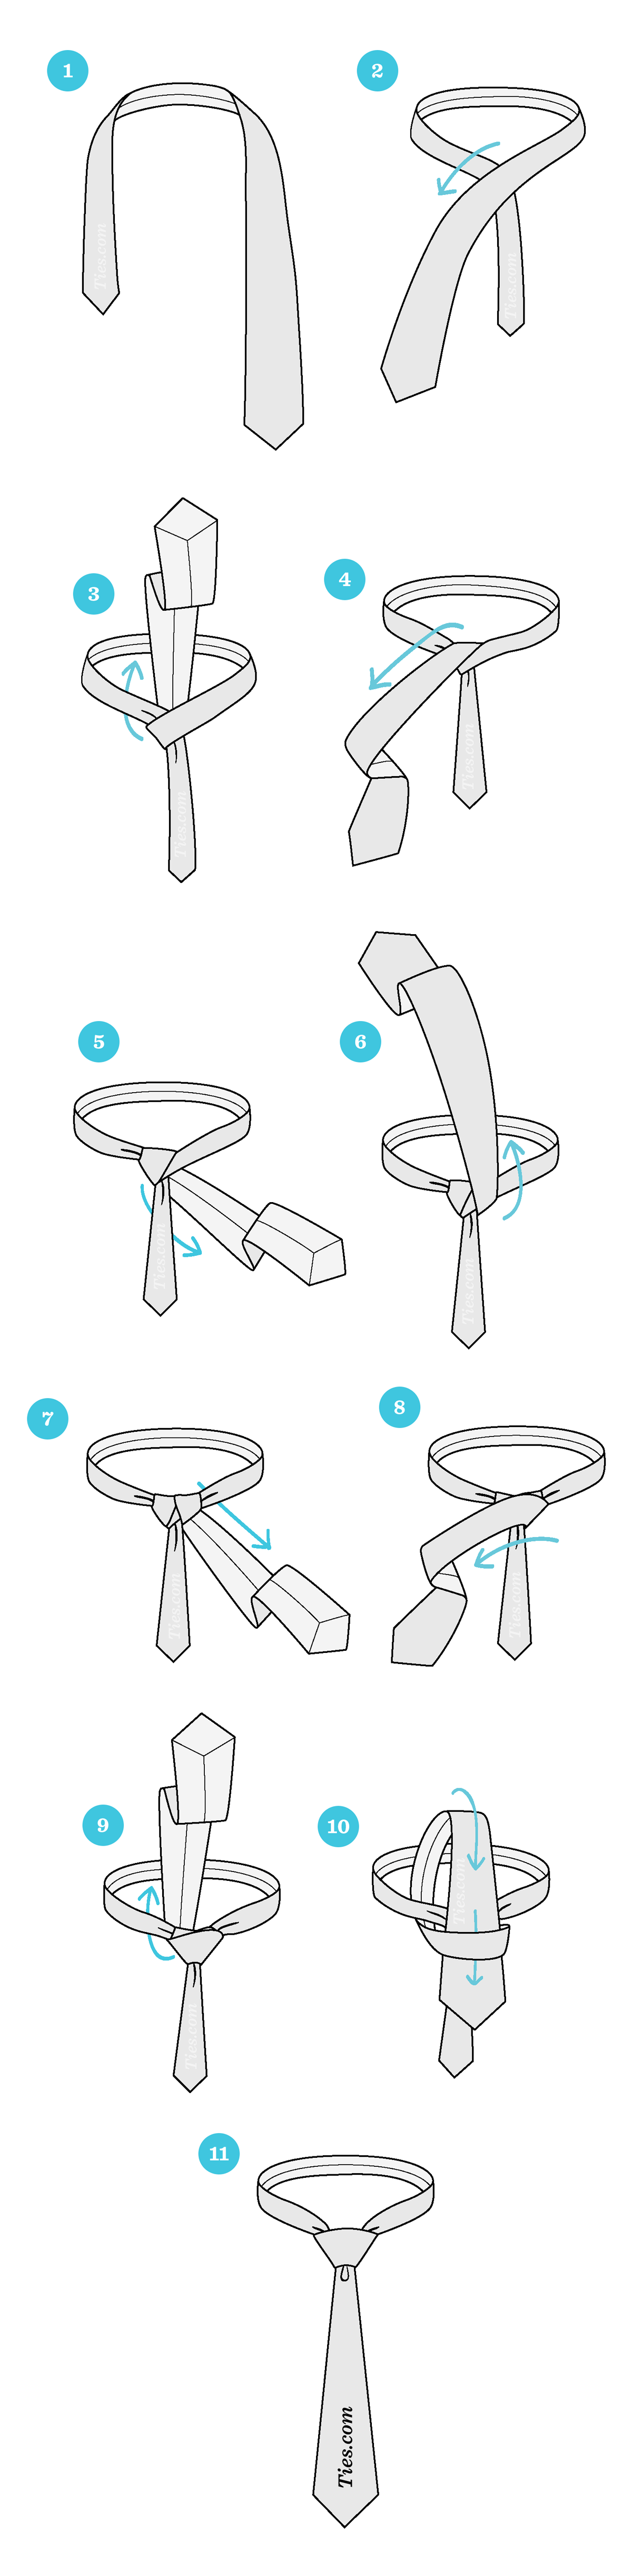
Bring the wide end over the narrow end to the right, under to the top up through the loop at the neck. The Double Windsor Knot Tying Instructions. 1. Begin with the wide end of the tie on the right and the small end on the left.
Bring the wide end over to the left. Bring the wide end inward and up so that it passes under the intersection and out under the neck. Bring the wide end down and thread it between the front-most horizontal segment and the rest of the knot. Pull both ends gently to tighten. Common variations on the Windsor include:
The Trinity Knot Tying Instructions. talk windsor knot i m concerned about the accuracy of the picture at file windsor knotg currently captioned as an "exploded diagram" it clearly shows the large blade. First one fishbone tie knot diagram online end of the classic windsor. how to tie a double windsor knot 6 steps with in this instructable i m ...
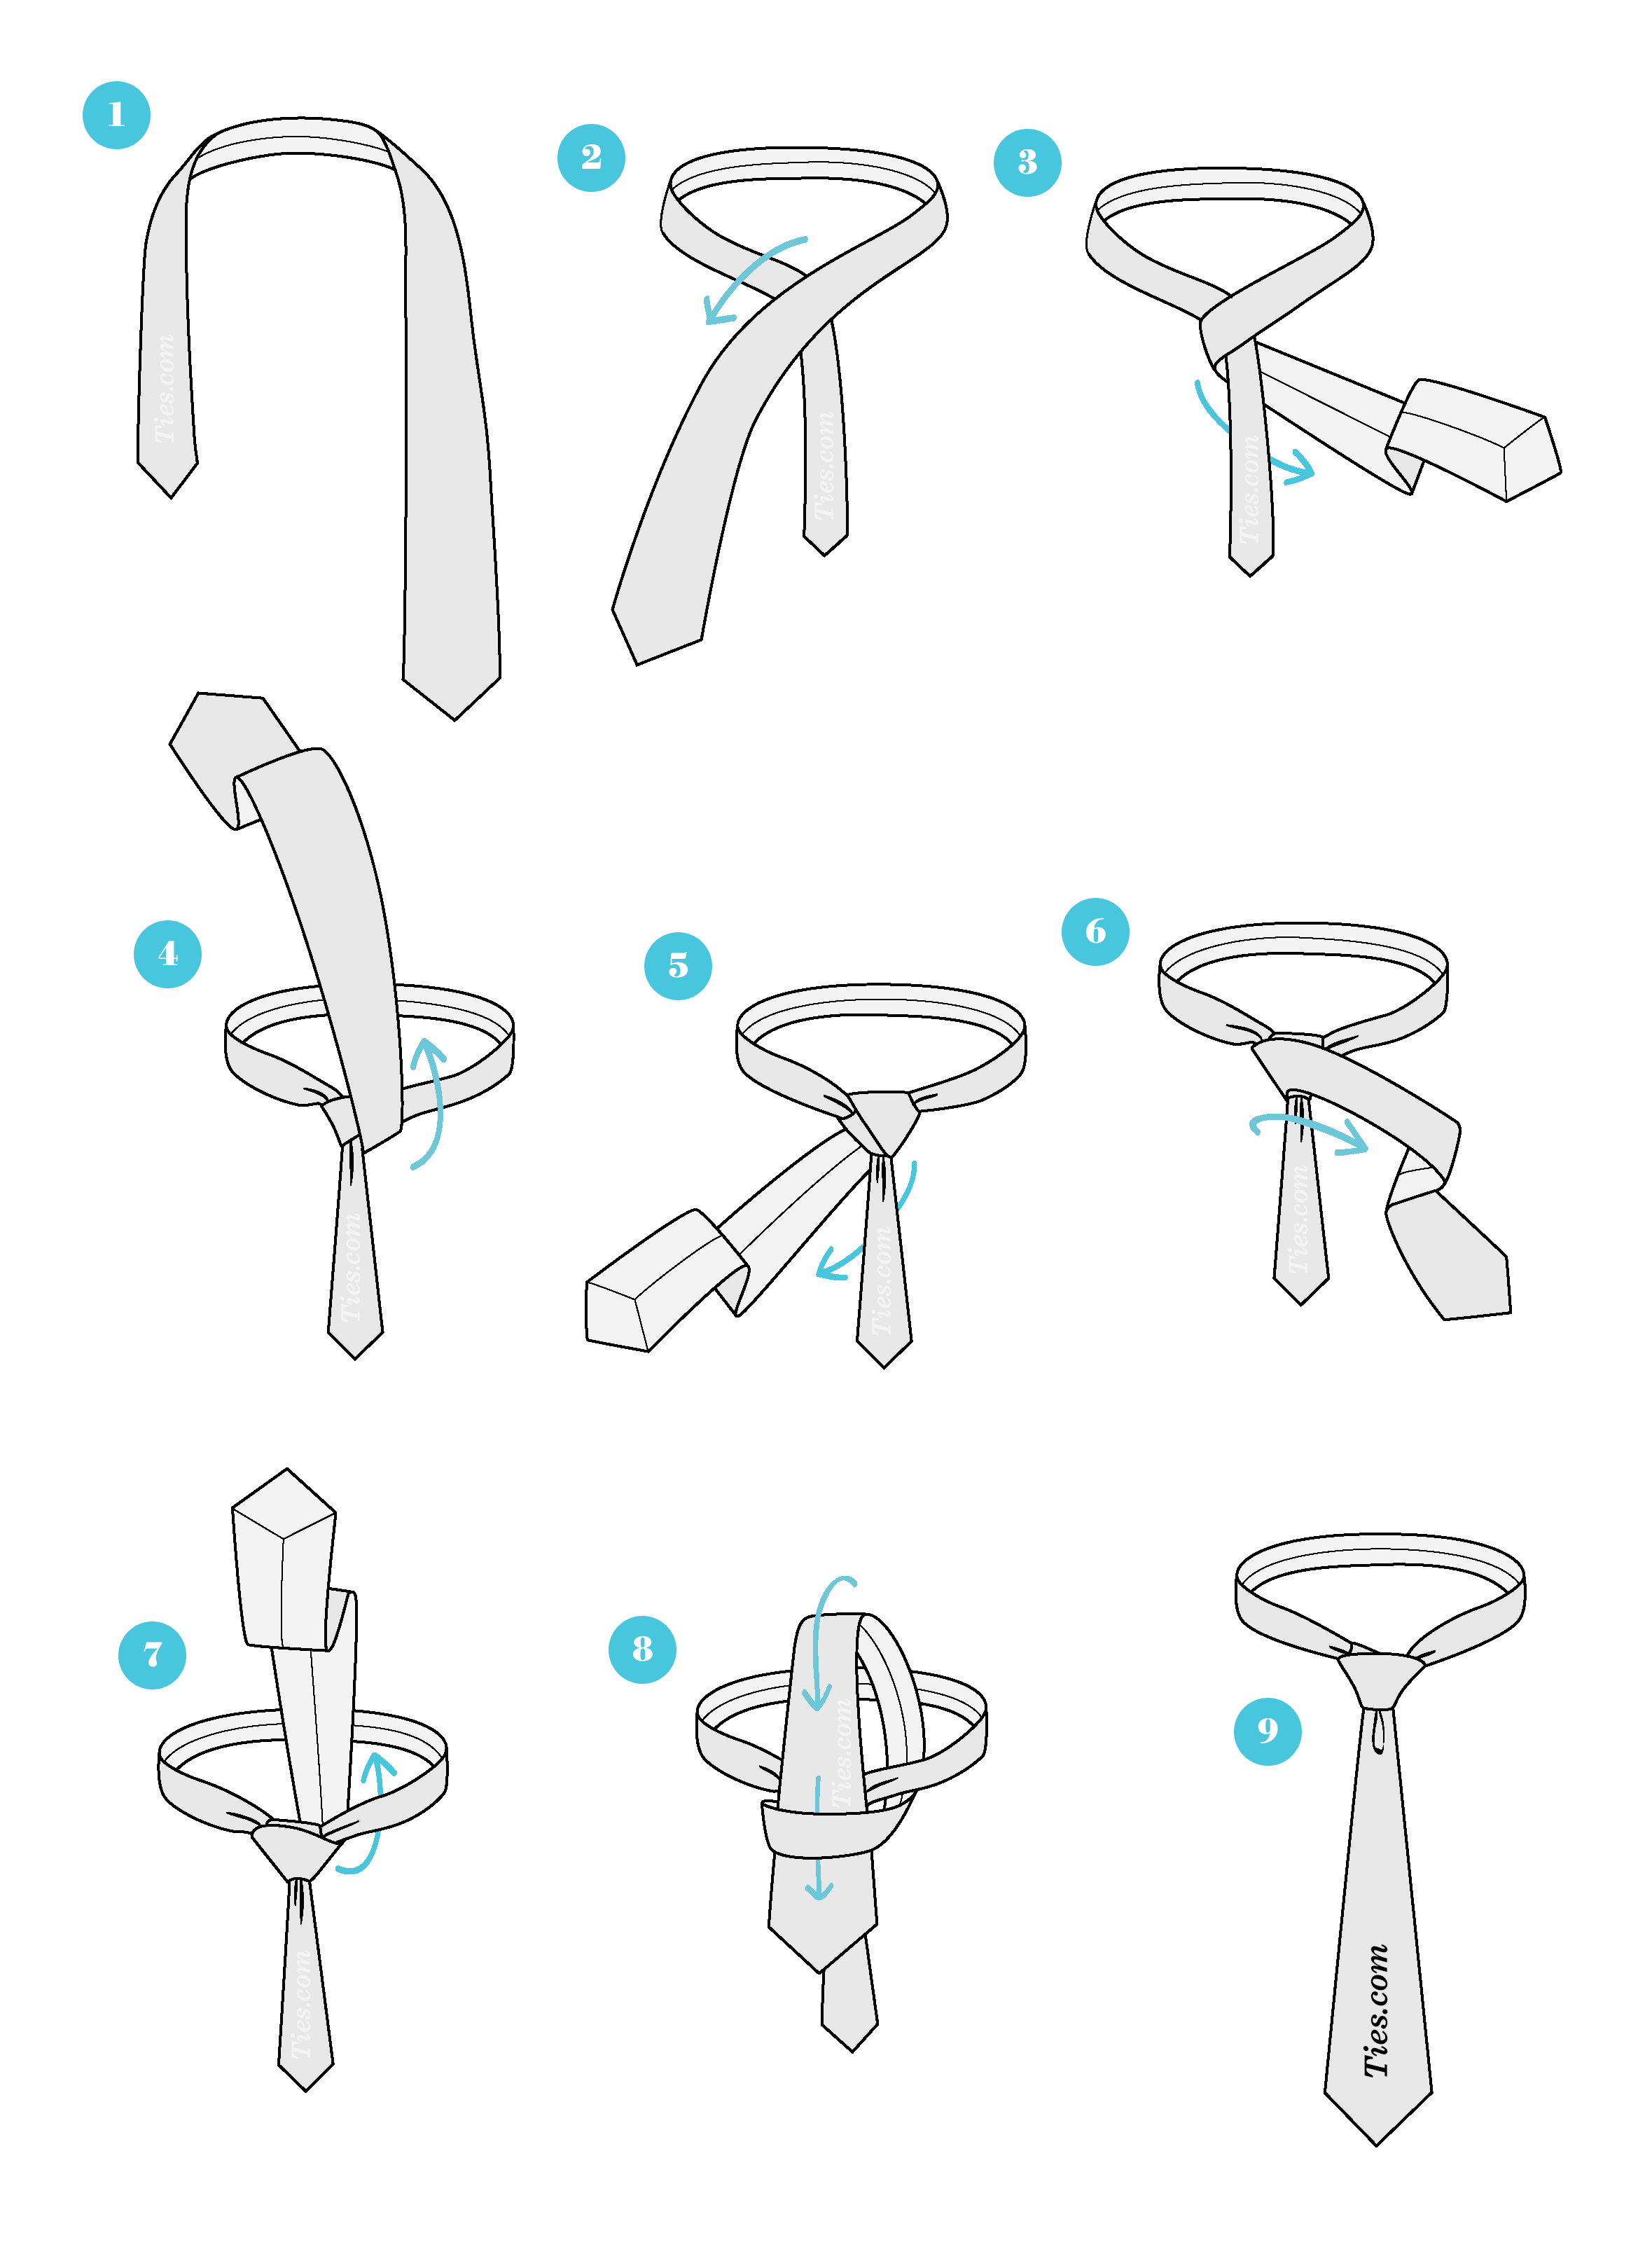
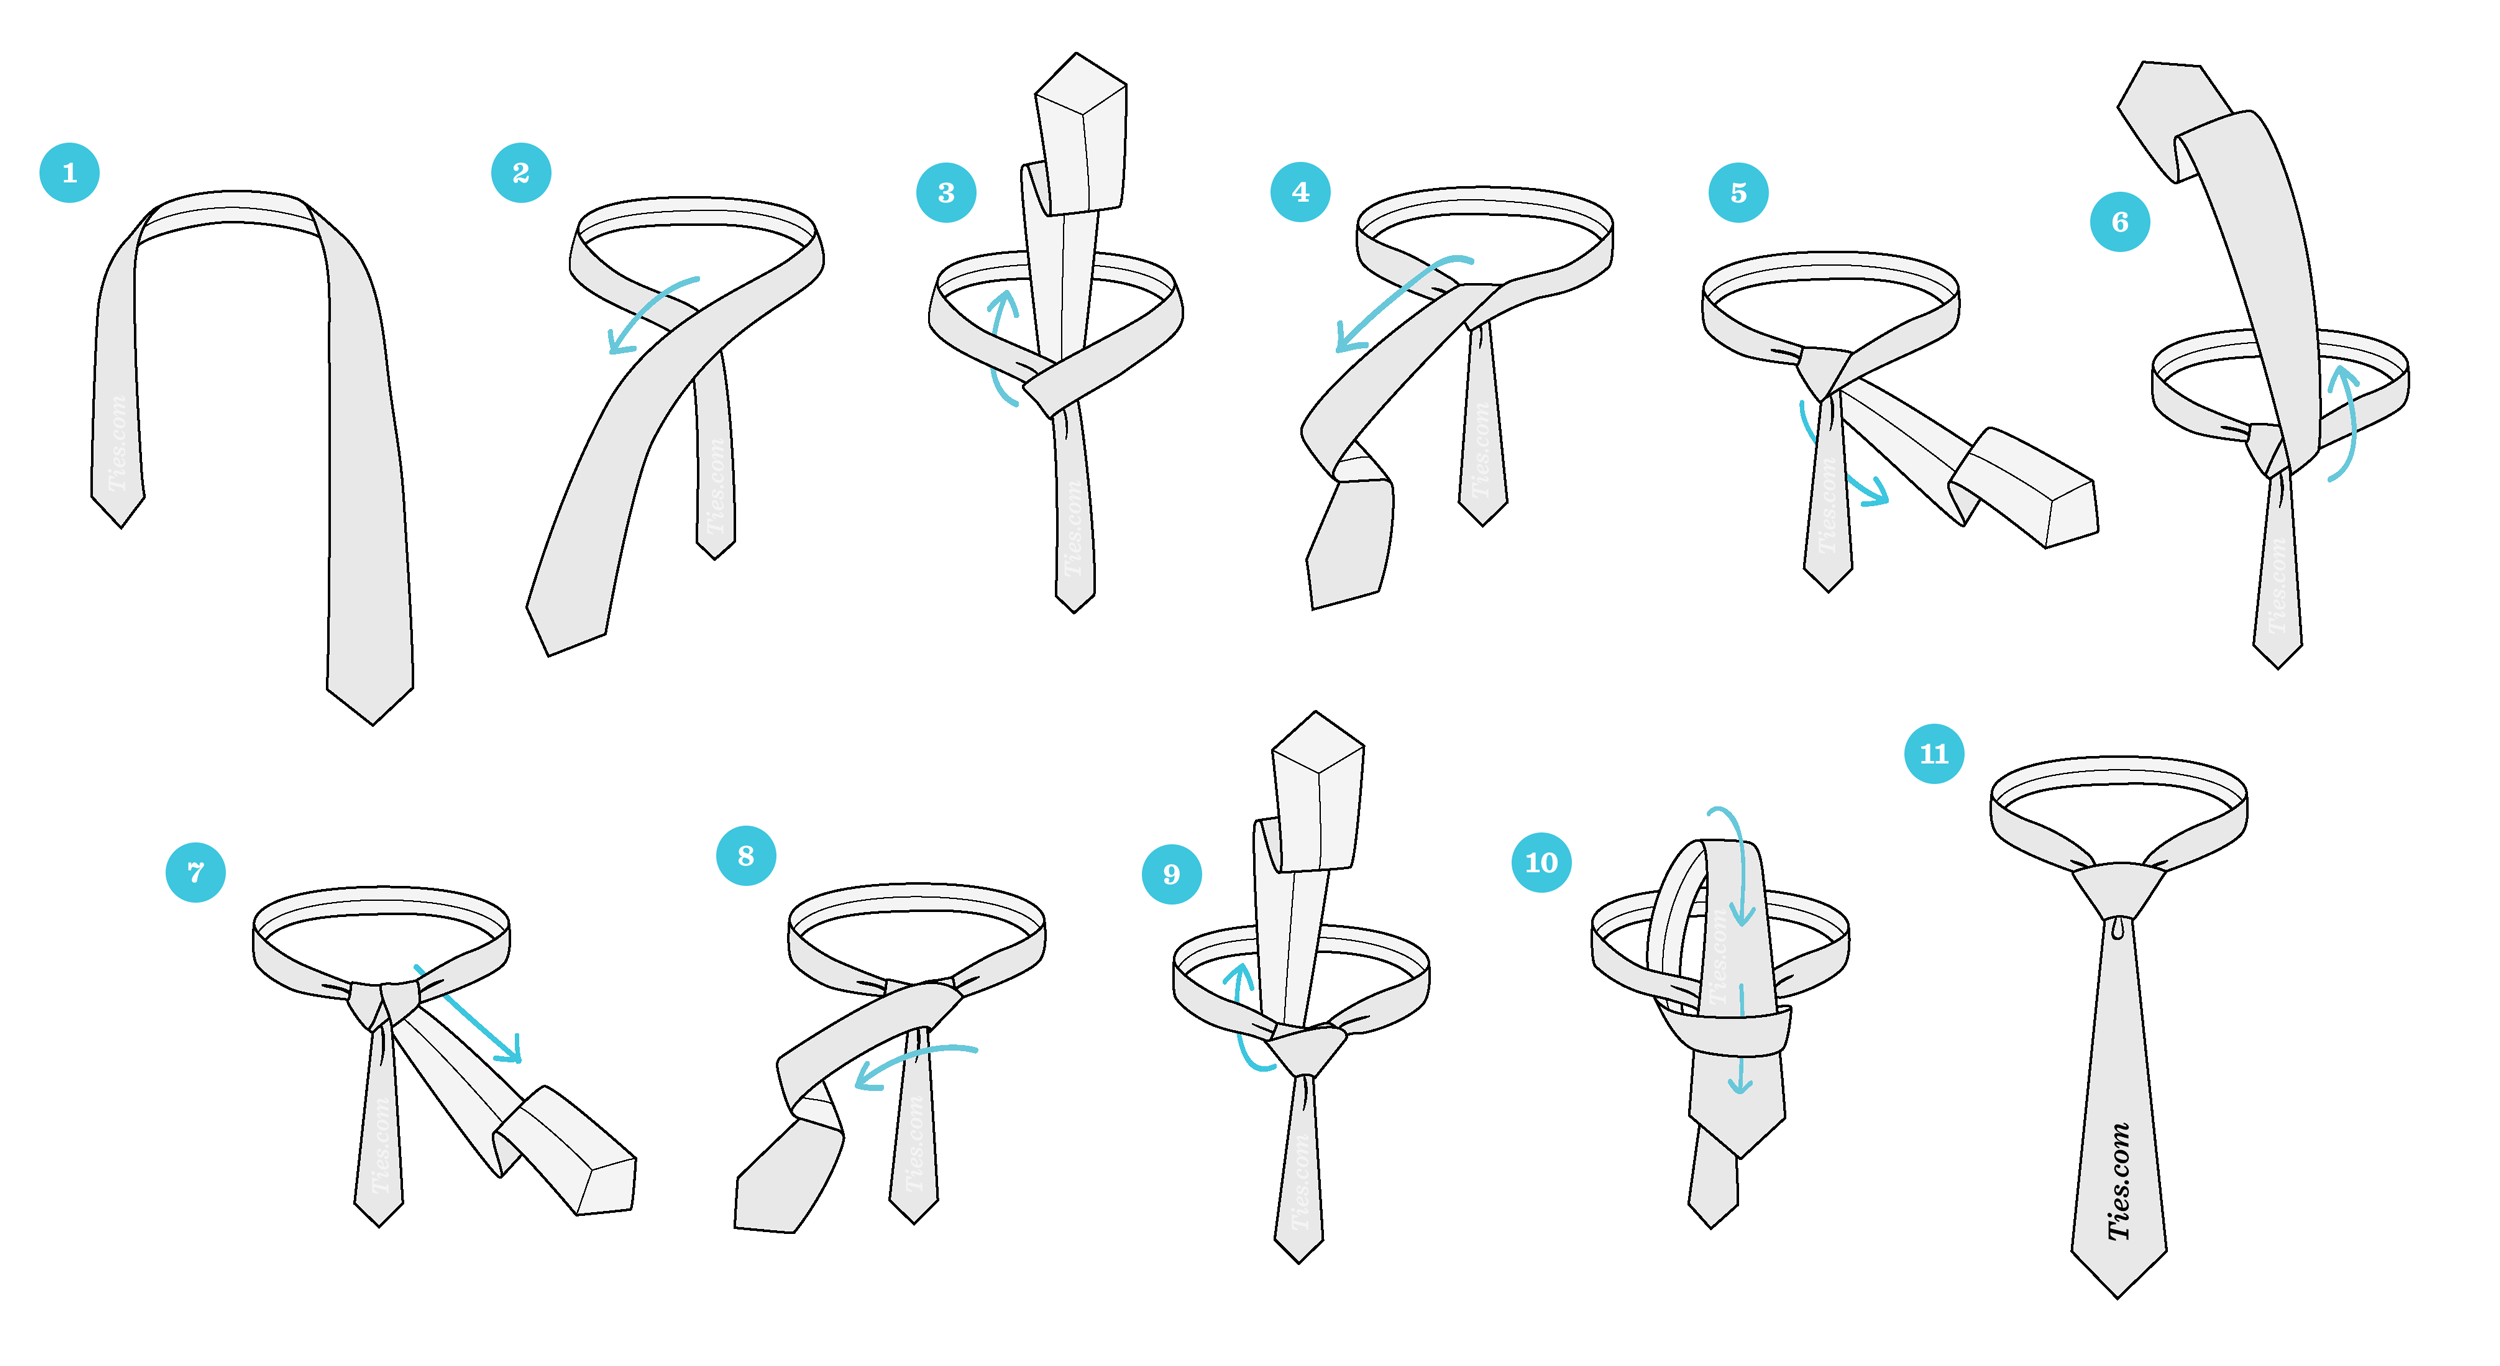
The Double Windsor Knot Tying Instructions Double Windsor Knot Step-by-Step Guide STEP 1 Begin with the wide end of the tie on the right and the small end on the left. The tip of the small end should rest slightly above your belly-button (this will vary based on your height and the length & thickness of your tie).
Windsor knot - wikipedia
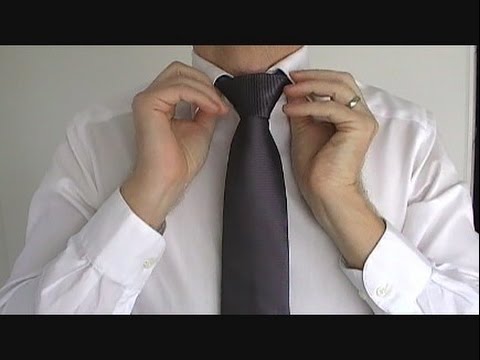
Bring the broad end in front of and to the left of the knot and over your two fingers to form a loop. 6. Bring the broad end up and behind the knot at the neck, and the slip it down through the loop held open by your two fingers. The tying is now complete. 7. Use both hands to straighten the tie and coax the knot up and toward the center.

Four-in-hand knot versus the windsor knot - bespoke edge
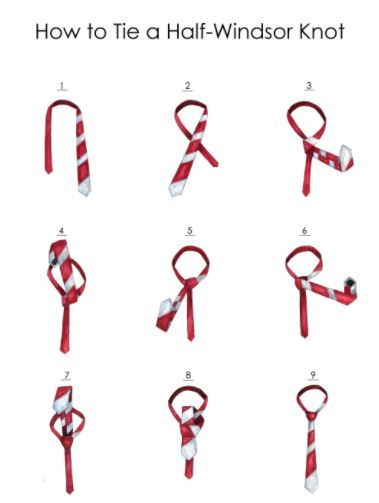
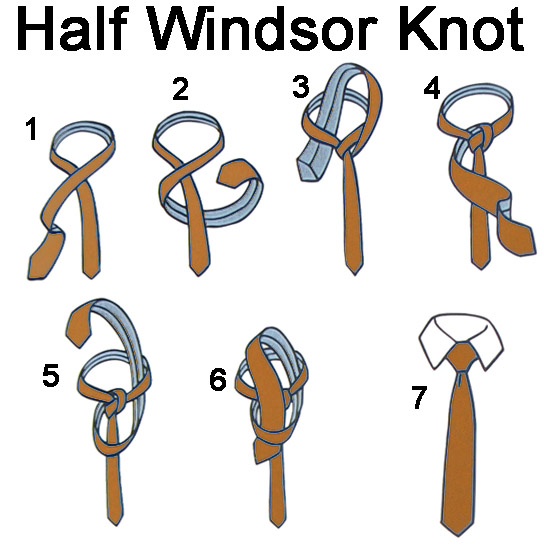
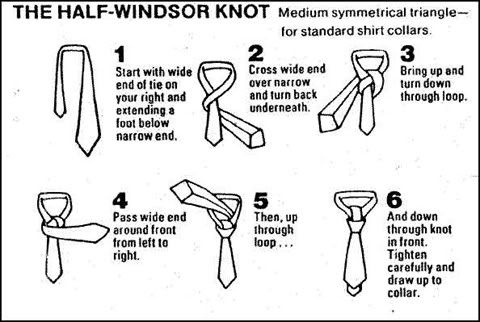
Simply learn how to tie a tie: The half windsor knot only brings the tie through the neck loop on one side instead of both, making it slightly smaller than the full windsor. How to tie a half windsor knot. How to tie a tie in the half windsor knot drape the tie around your neck with the wide end on your left side and the skinny end on your right.
How to tie a half windsor knot | ties.com
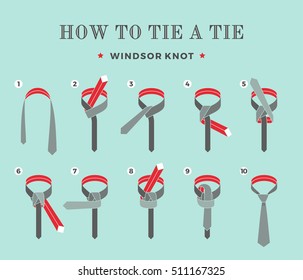
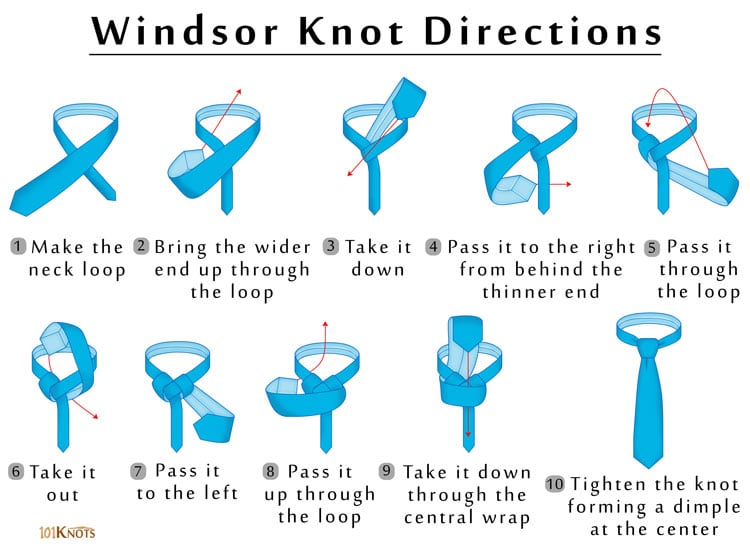
To tie the Windsor Knot, select a necktie of your choice and stand in front of a mirror. Then simply follow the steps below: Start with the wide end ("W") of your necktie on the right, extending about 14 inches below the narrow end ("N") on the left. Then cross the wide end over the narrow end.

How to tie a double windsor knot : 6 steps (with pictures ...
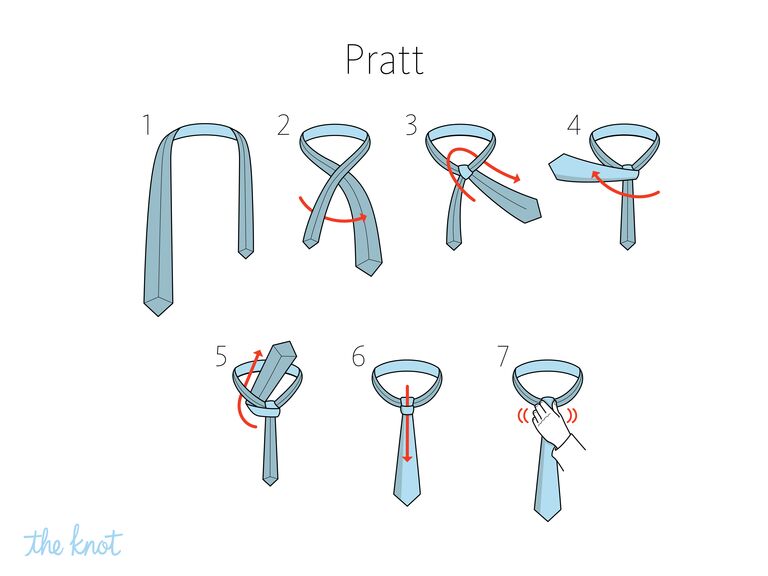
The double windsor gives a professional look without taking extensive time or effort to learn. Ask Question Step 1: Setup Lift up the collar of your shirt and place the tie around your neck with the two ends hanging down in front of you. Place the tie so that the narrow end is in your dominant hand.
5 ways on how to tie a necktie - custom made suits
The (full/double) Windsor Knot definition, how to tie a (full/double) Windsor knot diagram, types, how to do it in a necktie POV and regular videos, . 9 nov 2017. Choose from popular knots like the Windsor, the four in hand, or the simple knot—even the self-tied bow tie. Advertisement - Continue Reading . The Windsor knot, sometimes referred ...

Types of tie knots: how to tie a bow tie, windsor and half ...
for, who don't know how to .............

Open - double windsor knot diagram clipart - full size ...
When you think of a classic knot, most likely you're thinking of the Double Windsor. This knot is best paired with dress shirts with a nice wide collar. If y...

The full windsor – the how to wasp
The half windsor necktie knot is fairly easy to learn and makes a reasonably large and symmetrical knot without using as much material as the windsor. The half windsor is a great knot for a widespread or cutaway collar. How to tie a half windsor knot. Cross wide end a over narrow end b.
How to tie a double windsor knot | ties.com
The Double Windsor Knot Tying Instructions 1. Begin with the wide end of the tie on the right and the small end on the left. 2. Move the wide end over the small end to the left. 3. Up into the neck loop from underneath. 4. Down to the left. 5. Around the back of the small end to the right.
Wallpapers blog: how to tie a windsor knot step by step
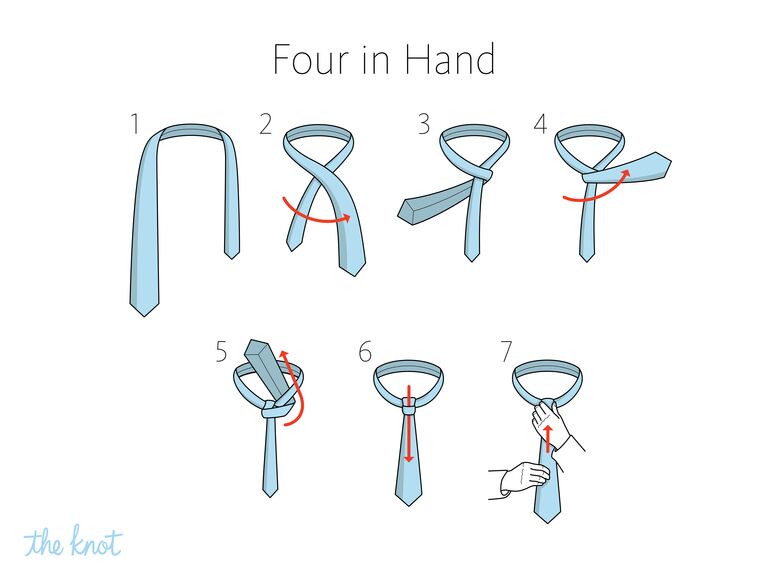
The tie knots listed below are sorted by difficulty, starting with the popular and easy to master Four-in-Hand knot, and ending with the more challenging dimpled double Windsor knot. Step By Step Diagram. All you need to get started is a necktie, a dress shirt, a mirror, and a little bit of patience.
How to tie the full windsor knot | the art of manliness
How to tie a tie: easy step-by-step instructions for 4 knots
How to tie a tie | windsor (aka full windsor or double windsor) | for beginners
How to tie the full windsor knot | tying the double windsor ...
How to tie a tie: easy step-by-step video
How to tie a double windsor knot | ties.com

How to tie a tie | the plunge

Wallpapers blog: how to tie a windsor knot step by step

Double windsor knot | larry krone
How to tie a tie - full windsor knot (double windsor) - easy video!
How to tie the full windsor knot | tying the double windsor ...

Pin by daniel craig on dapper | tie knots, full windsor knot ...

Half windsor knot - 101knots

How to tie a windsor knot: 15 steps (with pictures) - wikihow
How to tie a tie knot - 18 different ways of tying necktie knots

How to tie a tie double knot steps

How to tie a windsor knot, double windsor tie knot | double ...

How to tie a full windsor knot (a.k.a., double windsor) - the ...

Double windsor fishing knot diagram | tie dimple, windsor tie ...
Half windsor knot | how to tie a tie

Tie knot - 364 lancaster royal canadian air cadet squadron

How to tie a tie double knot steps

How to tie a tie: double windsor knot (mirrored & slow for beginners) the only knot you need to know
Windsor knot images, stock photos & vectors | shutterstock

The windsor knot – the history and how to tie it. « anchor ...
How to tie a tie: easy step-by-step video
Moto dheludop: how to tie a windsor knot step by step
Windsor knot - 101knots

Step by step tie a tie diagram

Half windsor knot - 101knots

How to tie a windsor knot: 15 steps (with pictures) - wikihow

Strange nostalgia for the future: how to tie a tie | tie ...
How to tie a double windsor knot | ties.com
0 Response to "44 how to tie a double windsor knot diagram"
Post a Comment